While on a short vacation over in Kent my wife and I have been visiting various second hand book shops in Whitstable and Canterbury.
I was fortunate enough to stumble upon a hard backed copy of "Compilers: Principles, Techniques and Tools" (Aho, Sethi, Ullman ISBN: 0321486811) also know as "The Dragon Book" which is the definitive compiler techniques undergraduate book - it is the compiler writers' Bible. The Amazon reviews on this tome speak for themselves.
The amusing thing was that last week I was rummaging around my book collection and could not find my original paper back copy and recalled I loaned it to somebody and never got it back and realised that buying another new copy would be an expensive proposition.
Well, the copy I just acquired is in near mint condition - I suspect the student who bought read the first chapter and then gave up since this book requires some intellectual effort to work through. I got it for £3.65 which is a little cheaper than the £50.99 being asked for the hardback copy at Amazon.co.uk. Result!
For those who haven't read this book, sample chapters can be found here. Also, the errata sheet for the book can be found here.
Thursday, 27 August 2009
Sunday, 23 August 2009
Blog Vacation
I won't be doing any blog postings over the next two weeks for a couple of reasons:
1. I'm going to be focusing on family quality time,
2. It's time to re-charge and take a break.
So, while I'm away from this blog, perhaps you could write some comments on stuff you'd like to see covered in this blog. Let me know what's good, what's bad and what can be improved.
I'm looking to keep this blog fairly technical, but I'd like to know if it's worth pushing out the same kind of content all the time. I'm open to new ideas, feedback and general comments!
Thanks... and keep in touch! Colin.
Thursday, 20 August 2009
Totem-tastic! BBC podcasts!
The Totem media player on Ubuntu has the ability to download the current podcast list from the BBC with minimum fuss. It's great for catching up on missed BBC radio podcasts when I've been out of the UK or too busy to hear them in real-time.
To get to the podcasts, fire up Totem with Applications->Sound & Video->Movie Player and then on the Playlist drop down (top right) select BBC and in a few moments Totem will have downloaded the contents index and you can browse and select the podcast you desire.
Pity this feature isn't promoted more. It saves one from rummaging around on the BBC website looking for relevant podcasts. Totem-tastic!
Wednesday, 19 August 2009
Git Version Control Books
Sometimes events occur like buses turning up: not a lot of activity and then suddenly two or three arrive in one go. Well, I can gladly say this applies to quality books on Git.
Several weeks ago I received from Amazon my long awaited copy of "Version Control with Git: Powerful tools and techniques for collaborative software development" by Jon Loeliger. For about £18 and at 328 pages it's fairly good value; it contains a good deal of tutorial style hands-on examples and also the in-depth know-how that one expects from a good technical book. Not bad at all really.
Today my colleague Amit twittered about another Git book "Pro Git" (Amazon, £19.24) by Scott Chacon and published by Apress. This book is available on-line under the Creative Commons license as well in printed form too. The great feature of this book is that it's been put up on GitHub and then forked and translated into other languages such as German, Chinese, Japanese and Russian. Anyhow, this looks to be another great Git book, and well worth looking at too.
So now there's no excuse for not getting to grips with git - here are a couple of quality text books to help new and experienced uses with daily git usage!
Atlanta LinuxFest
Pete Graner has blogged about the Ubuntu Kernel Team's forthcoming participation at the Atlanta LinuxFest. There are going to be several folk from Canonical giving talks on kernel driver writing and kernel debugging and we will also have a live USB stick to test your hardware with Karmic Alpha 4.
If you can make it, it will be an event worth attending!
Tuesday, 18 August 2009
ACPI Wake Alarm Bugs
A neat feature with most PCs is the ability to program the Real Time Clock (RTC) to trigger an alarm event at some time in the future and wake the PC up. Some projects such as MythTV use this to wake up a PC to record a TV programme. I've used it to make my laptop wake me up when I've forgotten my alarm clock when I've been travelling.
The method of programming the alarm is relatively straight forward - with the older kernels one would write the date and time to wake up into /proc/acpi/alarm and with newer kernels since 2.6.22 use /sys/class/rtc/rtc0/wakealarm. The API documented fairly well at the ACPI wakeup wiki page at mythtv.org.
The ACPI wake alarm is also used by the Ubuntu Kernel Team suspend/resume tests; these tests suspend a laptop for a specific amount of time and re-awaken the machine for programmatic suspend/resume soak testing. Unfortately, we are finding that some machines have a flakey or broken ACPI implementation for the wake alarm - for example, some machines need the alarm setting to zero or being set twice to work.
One can test quite easily of the ACPI wake alarm works - simply program it to trigger in some short time in the future and check to see if the alarm_IRQ field in /proc/driver/rtc is set to "yes". The second test is to wait until the alarm has triggered and check if the same alarm_IRQ field is now set to "no".
I've hacked up a quick-n-dirty test script to check this out and it can be found it my test script git repository here. Run this test and see - if your machine fails then it may be a good idea to check out the MythTV ACPI wake alarm troubleshooting section here. It may be a BIOS bug that's fixed with a new BIOS upgrade. Failing that, one should file a bug with upstream.
So far, I've see this problem on Lenovo 0768 series laptops, but I expect to see it on other machines too.
UPDATE: It appears the issue is more to do with the hwclock not being in UTC. One can sleep correctly using:
SECS=$((`cat /sys/class/rtc/rtc0/since_epoch`+$SLEEP_SECS))
echo 0 > /sys/class/rtc/rtc0/wakealarm
echo $SECS > /sys/class/rtc/rtc0/wakealarm
Note that I've written to wakealarm twice, the first time writes a zero which apparently helps some buggy BIOSs.
Or the heavy handed way (which will give Windows a headache):
hwclock --utc --systohc
Ubuntu Kernel Bug Days
Every two weeks the Ubuntu Kernel Team have special Kernel Bug days where we focus our attention on specific kernel bug categories. The desire is to attack a bunch of bugs that need some more love and attention - there are an awful lot of bugs and they all take time and effort to resolve.
The good news is that we also like participation from community members to help triage and help fix bugs. Sometimes you may have the same hardware or know of a fix to a specific kernel, hardware or BIOS related bug and thus you may be able to help solve a few of those lingering kernel bugs!
For more information on about our Kernel Team Bug Days, please visit
https://wiki.ubuntu.com/KernelTeam/BugDay - feel free to join in and help solve some kernel bugs!
Monday, 17 August 2009
Reflashing my 3COM Access Point
Every now and again I get enough spare time to try re-examine an on-going problem between my Wifi enabled Brother printer and my Wifi Access Point (AP). For some reason the printer cannot associate with my AP using WPA2 + PSK - after 3 association attempts it just gives up and prints out a failure message (which is annoying because this wastes paper!). Brother's help pages are not exactly helpful and resolving this outstanding issue has been little frustrating so far.
Looking at my AP, I discovered a new firmware update - the pros were it fixed some outstanding bugs and possible fix my printer associating issue that I've been wresting with but the cons to re-flashing it were:
1. There is a risk of the flashing going wrong and turning the AP into a brick.
2. The new firmware will introduce other unknown issues
3. Some features were going to be deprecated, such as the 2nd SSID feature.
Not liking risk, I've been putting off the re-flashing, but this weekend I gave it a go. What could possibly go wrong? :-)
I downloaded the new flash image (which was in a Windows self extracting executable archive) and with some painful steps extracted the firmware and bug fix manifest. Unfortunately the new firmware mean resetting the current configuration settings, so I got a hard copy of the configuration tweaks by printing these out from the clunky web admin tool.
Then I downloaded the new flash image and waited... and waited... and after 10 minutes the AP rebooted and I was much relieved to see it working again! I then zapped the settings to default and the re-applied my own configuration.
So did all this fix my laser printer associating problem? No. Ho hum. My next step will be to look at sniffing the wireless packets and try to figure out the problem at this level. Or maybe I should just keep the printer connected to the AP via an ethernet cable...
Sunday, 16 August 2009
Ubuntu on USB flash drives
Ubuntu provides the "USB Startup Disk Creator" tool to create a USB flash drive bootable image from the Ubuntu ISO images that can be downloaded from http://cdimage.ubuntu.com/releases/.
To use this tool, insert a FAT formatted USB stick, download a USB ISO image and then start the tool using: System->Administration->USB Startup Disk Creator and then enter you password.
You then select the ISO image you've just downloaded and make sure one has the correct USB flash drive selected. Then hit the "Make Startup Disk" button and after a few minutes you have a bootable USB flash drive equivalent to the ISO CD-ROM but with the extra bonus that it has persistent storage to save your documents and settings.
However, nowadays USB flash drives come in at 4GB to 16GB formats, so you have plenty of space to do a full Ubuntu installation and allow you to install extra packages - just like a conventional HDD. Also, the image will boot up much faster than the "USB Startup Disk" method. It's also worth noting that spending a little more on a fast USB flash drive is worth it. I've been using a 4GB Buffalo USB flash drive for a while and it's fast - don't be a cheapskate and go for price over speed.
A Ubuntu installation on a USB flash device can be achieved in various ways - one way is to initially install it using QEMU and then to dd the QEMU image onto the USB flash drive. This will then provide you with a system that can be run just like any conventional Ubuntu system on a HDD.
The instructions for this technique are written up here https://wiki.ubuntu.com/KernelTeam/InstallonUSBkey - prepare to take ~80 minutes or more to create the basic QEMU image.
The cool feature of using QEMU is that one can create a clean image which can then be copied onto multiple USB flash devices - which is ideal for rolling out test images for friends to try out or for creating test images with new features for testing at conferences or sprints.
Saturday, 15 August 2009
Debugging USB Problems
Recent Linux Kernels have the usbmon facility that allows one to gather traffic information (USB tracedata) on USB buses. It's a very helpful tool for allowing one to do low level USB debugging and my colleague Stefan Bader has written up a very useful guide here on the Ubuntu Kernel Team Knowledge Base. The guide describes how to debug USB Storage devices, and drills down to looking at the bulk transport layer. All in all it's a handy guide to show one how to dig in to examining USB traffic and sure to be help when one has troublesome USB devices that sometimes need quirking or workarounds.
Other usbmon guides can be found at:
http://groups.google.com/group/microdia/web/usbmon-user-guide
http://linuxinterviews.blogspot.com/2009/04/using-usbmon.html
http://www.linuxinsight.com/files/ols2005/zaitcev-reprint.pdf
Other usbmon guides can be found at:
http://groups.google.com/group/microdia/web/usbmon-user-guide
http://linuxinterviews.blogspot.com/2009/04/using-usbmon.html
http://www.linuxinsight.com/files/ols2005/zaitcev-reprint.pdf
Friday, 14 August 2009
Cloning my installed packages
This week was a bit of a nightmare because I suffered a HDD crash on my laptop. Installing Ubuntu from new isn't a big deal and restoring my /home data is slow but straight forward. However, installing all my favourite previously installed packages from memory is just a pain and nearly impossible to get right. The solution is to keep a record of what's installed so that one can pull in these packages on a clean fresh install.
To dump out the installed packages on a system, use:
dpkg --get-selections > installed.log
To re-install these packages on a clean fresh install use:
sudo dpkg --set-selections < installed.log
and then run:
sudo apt-get -u dselect-upgrade
It's also helpful to keep a backup of any configuration settings, e.g. files in /etc. I hope this saves you some pain next time you hit this kind of problem!
Ubuntu 9.10 Karmic Alpha 4 - Ready to Test!
Ubuntu 9.10 Karmic Alpha 4 is now ready to download and test. This is a great opportunity to boot your machine with a LiveCD (or USB image) and check out to see if there any regressions - and if so, please file a bug so it can be fixed before the final version is rolled out.
I'm currently running Karmic on my laptop and servers. I'm really impressed with the improved boot speed and the Kernel Mode Setting (KMS). KMS is especially effective with suspend/resume and also reduces the screen mode transitions during boot.
So download a suitable Alpha 4 image give it a try!
I'm currently running Karmic on my laptop and servers. I'm really impressed with the improved boot speed and the Kernel Mode Setting (KMS). KMS is especially effective with suspend/resume and also reduces the screen mode transitions during boot.
So download a suitable Alpha 4 image give it a try!
Thursday, 13 August 2009
Disabling my Synaptics Mouse using xinput
My Lenovo 3000 N200 Laptop has been suffering a bit lately from old age. On returning from a week working with my fellow colleagues in Dublin the 120GB HDD died. Fortunately I had early warning from some SMART monitoring tools telling me I had a potential HDD failure and I was able to backup all my data before the HDD finally died and restore it on a spare HDD. I managed to find a fairly reasonable Western Digital Scorpio 160GB HDD replacement for about £27 (w/o VAT and postage) which should arrive by Monday.
Unfortunately the Synaptics touchpad has been getting really flakey. Typically the touchpad gets random button press events and then the button states get locked and toggling the buttons just returns the mouse into some weird unpredictable state. Try using GNOME when the buttons states are reversed or stuck down and you get to see how frustrating this can be!
This has not been so much of a problem as I normally use a wireless mouse so the touchpad is never normally used. It's just a pain when the touchpad just goes into weird event mode at random times, usually when you least expect it! My long term solution is to strip the machine down and see why the touchpad is misbehaving (I've downloaded the maintenance manual from Lenovo and it's not a 5 minute task to fix it). Hence I need a quick workaround before I go insane from weird mouse events.
My original plan was to disable the mouse driver, but in Karmic it's built in so this would require rebuilding the kernel with the driver compiled out and I've been resisting this kind of ugly hack. However, tonight I found a better workaround to disable the touchpad:
1. Find the Synaptics Mouse using:
xinput list
This dumps out a load of info, e.g.:
SynPS/2 Synaptics TouchPad" id=8 [XExtensionPointer]
Type is TOUCHPAD
Num_buttons is 12
Num_axes is 2
Mode is Relative
Motion_buffer is 256
Axis 0 :
Min_value is 1472
Max_value is 5472
Resolution is 1
Axis 1 :
Min_value is 1408
Max_value is 4448
Resolution is 1
and a lot more besides.
2. This enabled me to find the textual handle and id number (8) to my touchpad. I then listed the properties using:
xinput list-props "SynPS/2 Synaptics TouchPad"
which dumps out all the properties, e.g.:
Device Enabled (115): 1
Synaptics Edges (260): 1752, 5192, 1620, 4236
Synaptics Finger (261): 24, 29, 255
Synaptics Tap Time (262): 180
Synaptics Tap Move (263): 221
Synaptics Tap Durations (264): 180, 180, 100
..and a lot more properties too..
I then spotted the "Device Enabled" property, which I then disabled using:
xinput set-int-prop "SynPS/2 Synaptics TouchPad" "Device Enabled" 8 0
..and my touchpad was disabled! No more annoying stray events!
3. I next added this rune into the Startup Applications Preferences (from System->Preferences->Startup Applications).
Hopefully when I've got a spare hour or two and the kids aren't around I will strip this laptop down and fix the touchpad. Meanwhile, I'm happy to get control back from my misbehaving touchpad!
acpi_serialize boot flag
ACPI in a multi processor environment can be a headache - a subtle one at that. The Differentiated System Description Table (DSDT) contains ACPI Machine Language (AML) bytecode that gets interpreted by the Linux Kernel ACPI driver. The DSDT varies from machine to machine as it is totally hardware specific. Sometimes an AML method is declared as NotSerialized when in fact it should be Serialised to prevent multiple threads of execution occurring simultaneously. To fix this, one could re-write the DSDT (non exactly user friendly), or ask for the BIOS to be fixed (not very likely).
Fortunately the Linux kernel has a workaround - the acpi_serialize boot flag. Boot the kernel with the acpi_serialize kernel boot flag and hopefully this will resolve this kind of issues.
It begs the question why doesn't this get picked up on other Operating Systems. Perhaps their ACPI AML interpreter does not allow concurrency, or they just ignore these kind of bugs and don't report them. Anyhow, ultimately these kind of BIOS bugs need addressing and meanwhile there is a Linux workaround.
dd and SIGUSR1
One neat feature in the dd utility is the ability to send it SIGUSR1 and it will dump out the current I/O statistics. This is useful when one is dd'ing a large amount of data and one would like to know how much data has been transferred or you want to see the current I/O rate. Below is an example where I'm filling a raw disc with zeros:
$ sudo -i
# dd if=/dev/zero of=/dev/sdb bs=1M & ddpid=$!
# kill -USR1 $ddpid
320+0 records in
320+0 records out
335544320 bytes (336 MB) copied, 18.5097 s, 18.1 MB/s
$ sudo -i
# dd if=/dev/zero of=/dev/sdb bs=1M & ddpid=$!
# kill -USR1 $ddpid
320+0 records in
320+0 records out
335544320 bytes (336 MB) copied, 18.5097 s, 18.1 MB/s
Wednesday, 12 August 2009
Ouch that hurts!
Well, my blogging throughput has been a little slow over the past week for various reasons. Currently I'm suffering from a slipped disc in my neck which is killing me and making life difficult as it's trapping nerves in my arms and legs and that makes sitting up and typing a little difficult (my fingers go numb and my legs go wobbly!)
Hopefully I'm going to be operated on by the UK's National Health Service sometime before the the Sun turns into a lump of coal, but in the mean time I'm taking mind-numbing pain killers. If this blog goes quiet it just means I've had an operation and I'm out of action for a while. If the blog goes very quiet you know that the operation when hideously wrong(!).
Meanwhile, I will still try and post some technical bits-and-bobs to this blog, but don't hold your breath.
Saturday, 8 August 2009
Input Utils - Tools to debug the /dev/input devices
The input-utils package are a bunch of tools for examining and interacting with the /dev/input/event* input devices. Sometimes one needs to figure out why certain key events don't work, or why they are mapped incorrectly - in which case input-utils are the tools to turn to.
To install on a Ubuntu system use:
sudo apt-get install input-utils
The first command that's of interest is lsinput - it dumps out all the input devices and the associated details about the device. This command need to be run with sudo, here is an example:
sudo lsinput
/dev/input/event0
bustype : BUS_HOST
vendor : 0x0
product : 0x5
version : 0
name : "event0"
phys : "PNP0C0D/button/input0"
bits ev : EV_SYN EV_SW
/dev/input/event1
bustype : BUS_HOST
vendor : 0x0
product : 0x1
version : 0
name : "event1"
phys : "PNP0C0C/button/input0"
bits ev : EV_SYN EV_KEY
..etc..
One can then dump out the keyboard mapping of a particular event device using input-kyb by specifing the Nth device number:
sudo input-kbd 3
/dev/input/event3
bustype : BUS_ADB
vendor : 0x1
product : 0x1
version : 256
name : "event3"
bits ev : EV_SYN EV_KEY EV_REL
bits: BTN_LEFT
bits: BTN_RIGHT
bits: BTN_MIDDLE
Finally, one can observe input events using the input-events command. The following example watches events on input device 4 which just so happens to be the keyboard on my Dell Inspirion 6400 laptop:
sudo input-events 4
/dev/input/event4
bustype : BUS_I8042
vendor : 0x1
product : 0x1
version : 43841
name : "event4"
phys : "isa0060/serio0/input0"
bits ev : EV_SYN EV_KEY EV_MSC EV_LED EV_REP
waiting for events
17:38:02.671577: EV_MSC code=4 value=28
17:38:02.671601: EV_KEY KEY_ENTER (0x1c) released
17:38:02.671606: EV_SYN code=0 value=0
17:38:04.107847: EV_MSC code=4 value=42
17:38:04.107872: EV_KEY KEY_LEFTSHIFT (0x2a) pressed
17:38:04.107877: EV_SYN code=0 value=0
17:38:04.202190: EV_MSC code=4 value=42
17:38:04.202215: EV_KEY KEY_LEFTSHIFT (0x2a) released
17:38:04.202221: EV_SYN code=0 value=0
17:38:06.052641: EV_MSC code=4 value=58
17:38:06.052666: EV_KEY KEY_CAPSLOCK (0x3a) pressed
17:38:06.052672: EV_SYN code=0 value=0
17:38:06.053025: EV_LED code=1 value=1
17:38:06.154324: EV_MSC code=4 value=58
17:38:06.154348: EV_KEY KEY_CAPSLOCK (0x3a) released
17:38:06.154354: EV_SYN code=0 value=0
17:38:09.378158: EV_MSC code=4 value=157
17:38:09.378183: EV_KEY KEY_RIGHTCTRL (0x61) pressed
17:38:09.378190: EV_SYN code=0 value=0
17:38:09.430852: EV_MSC code=4 value=157
17:38:09.430876: EV_KEY KEY_RIGHTCTRL (0x61) released
17:38:09.430882: EV_SYN code=0 value=0
timeout, quitting
With these tools one can debug a system to see if inputs generate the expected event codes and hence help sort out issues such as why hotkeys don't work or are mapped incorrectly.
To remap events, use the input-kbd command as follows:
1. Dump the mapping out to a file using input-kbd on the appropriate input device
2. Edit the mappings on the file using your preferred text editor
3. Load up the new mappings using input-kbd -f mappingfile devicenumber
..hopefully this helps fix some of those weird button/keyboard mapping issues.
Friday, 7 August 2009
Hotkey Complexity
Hotkeys require a range of voodoo to get to work reliably mainly because there are a range of different ways to get the input events from the hotkeys - each laptop seems to do this differently(!).
So when a hotkey does not work, it can be a little daunting to figure out exactly how a hotkey is wired up and hence how to make it work. Fortunately there is a Ubuntu wiki page describing how to track down and sort out hot key issues.
The wiki https://wiki.ubuntu.com/Hotkeys/Troubleshooting has a quick run down on the components involved in handling hotkeys and a step-by-step troubleshooting guide to walk one through diagnosing and fixing problematic hotkeys.
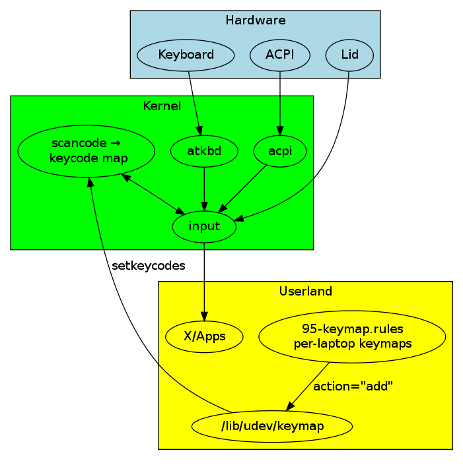
If you want to understand the underlying architecture it's worth checking out https://wiki.ubuntu.com/Hotkeys/Architecture for a run down on the different ways hotkeys have been handling in Ubuntu Karmic, Jaunty, Intrepid and Hardy. Below is the current architecture for Karmic:
As you can see, it's rather a complex affair. I recommend following the Wiki pages if you have any hotkey issues - hopefully this will enable you to fix any of those hotkeys that just sit there and don't seem to work on your laptop or netbook.
Thursday, 6 August 2009
Running in an Intepreted World
One would think that faster processor speeds would make applications run faster and provide a snappier responsive user experience. Reality is of course different and more complex than this. We live in a world of fast application development where code is written in convenient object-oriented languages which run using platform independent byte code; for example, Java, JavaScript, Python, Mono to name but a few. While this is the accepted norm for application development, it's also true in different domains. For example, QEMU does a kind of just-in-time instruction translation and essentially this is a very specialised interpreter, be it machine object code.
More interesting is that Intel PC BIOSs contain AML byte code - this code is in the ACPI DSTD and is interpreted by the Linux ACPI AML interpreter. So even the Linux kernel contains an interpreter to run BIOS ACPI code. But this interpretation of byte code code goes even further in the low-level system side. Soon we will see newer PCs will moving away from the traditional BIOS boot mechanism and using Extensible Firmware Interface (EFI). The boot mechanism allows EFI bootloaders to be compiled into an EFI byte code image using a PE/COFF (Portable Extensible Common Object File Format) executable header. So even the system bootstrapping can run intepreted byte code.
We have a zoo of many flavours of byte code; much effort is put into making them run efficiently on different processors. Some may argue that code is nearly as fast as native code, and the gain from portability and flexibility is a price worth paying at the cost of a slower execution.
Whatever the argument, I do wonder how much longer my laptop battery would last of my CPU was executing compiled native code instead of churning away interpreting different forms of byte code. I'm very curious to find out what percentage of CPU cycles are used in running native code and in running intpreted code, and how this will look in 10 years time.... you never know, perhaps by 2020 large chunks of the kernel will be interpreted(!)
Wednesday, 5 August 2009
vim tricks
Some tools are loaded with plenty of features and it's all too easy to get familiar with just a small subset of these features and forget or not explore the full functionality of the tool.
Take vim for example - it's an extended vi clone that comes with lots of vi extensions and improvements. I learnt to use vi back in the late 1980's and got settled into using enough functionality to be productive. Then I switched to using vim and never really put in all the effort to explore all the extra features it supports. Then this morning I stumbled upon this vim trick:
cmap w!! %!sudo tee > /dev/null %
which basically allows one to write over a file as sudo. Yes it's evil, but it it's also very helpful!
There are a whole bunch of other vim tricks listed at stackoverflow.com - I recommend checking it out as it contains some useful vim nuggets of goodness. I also recommend visiting viemu.com's vi/vim cheat sheet page - it has some excellent vi/vim keymap images.
Tuesday, 4 August 2009
Visit to Tog
I'm currently over in Dublin for a Developer Sprint and last night a bunch of us visited TOG - the Dublin Hackerspace. Monday is the micro controller night, and we had a look at some home brew Arduino (open hardware) projects. The visit is blogged about here and here. Steve Conklin has uploaded some photos of the visit on flickr. It's great to see some creative hardware hacking!
Sunday, 2 August 2009
No teeth!
I'm getting more confident and hence more adventurous in the way I fly my ESKY Lama model helicopter. I'm crashing it far less frequently and replacing the blades rarely now. Unfortunately this weekend I tipped it over at full power and did not pull off the throttle quickly enough and in doing so stripped a lot of teeth off the lower rotor gears.
The gearbox was covered in black plastic dust and debris - basically the brass motor gears had ground and stripped the plastic rotor gear teeth off in a fraction of a secound. Ouch!
This page has a lot of helpful info on how to repear this damage - it's quite a painstaking process and it's not a 10 minute fix. I'm now off to look for some stronger gear replacements.. ..and make sure I don't wreck the gears again like this!
Saturday, 1 August 2009
EtherApe - Network Analysis Tool
EtherApe is a helpful graphical real-time network connectivity monitoring tool that allows one to quickly see the open connections on the local network.
It supports a variety of devices, covering Ethernet, FDDI, Token Ring, ISDN, PPP and SLIP. Hosts and links between hosts change in size with traffic, and protocols are coloured according to the type of protocol.
To install on an Ubuntu system use:
apt-get install etherape
And run it as a root user using Applications->Internet->EtherApe (as root)
To capture Wifi network activity, select Capture->Interfaces->wlan0
Below is an example of EtherApe running on my laptop:
There is a per-protocol network summary viewable from View->Protocols (tick to enable) or by clicking on the "Prot." button - it produces output as follows:
There a quite a few tweakables, e.g. changing colours, selecting in/out bound traffic and timing and scaling of nodes and links. Also there are some hot keys controls such as pressing Alt-I to view just IP traffic and Alt-T to view just TCP traffic.
One can double-click on a node on the graph and EtherApe will drill down and display a per-node network activity summary, for example:
All-in-all EtherApe is useful little tool that can help one to check quickly on what kind of traffic is on one's network and to see where all the packets are going. Not bad at all!