Showing posts with label USB. Show all posts

Friday, 17 February 2012

Introducing the Firmware Test Suite Live (fwts-live)

Firmware Test Suite Live (fwts-live) is a USB live image that will automatically boot and run the Firmware Test Suite (fwts) - it will run on legacy BIOS and also UEFI firmware (x86_64) bit systems.

fwts-live will run a range of fwts tests and store the results on the USB stick - these can be reviewed while running fwts-live or at a later time on another computer if required.

To install fwts-live on to a USB first download either a 32 or 64 bit image from http://odm.ubuntu.com/fwts-live/ and then uncompress the image using:

 bunzip2 fwts-live-*.img.bz2  

Next insert a USB stick into your machine and unmount it. Now one has to copy the fwts-live image to the USB stick - one can find the USB device using:

 dmesg | tail -10 | grep Attached  
 [ 2525.654620] sd 6:0:0:0: [sdb] Attached SCSI removable disk  

..so the above example it is /dev/sdb, and copy using:

 sudo dd if=fwts-live-oneiric-*.img of=/dev/sdb  
 sync  

..and then remove the USB stick.

To run, insert the USB stick into the machine you want to test and then boot the machine.  This will start up fwts-live and then you will be shown a set of options - to either run all the fwts batch tests, to select individual tests to run, or abort testing and shutdown.


If you chose to run all the fwts batch tests then fwts will automatically run through a series of tests which will take a few minutes to complete:
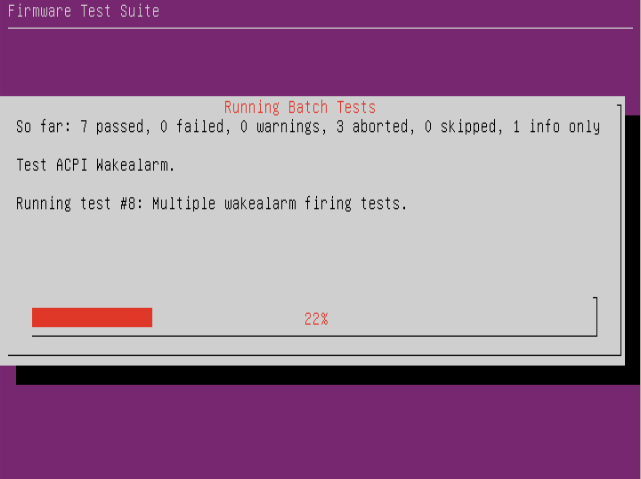

and when complete one can chose to view the results log:


if "Yes" is selected then one can view the results. The cursor up/down and page up/down keys can be used to navigate the results log file.  When you have completed viewing the results log, fwts-live will inform you where the results have been saved on the USB stick (so that one can review them later by plugging the USB stick into a different machine).


A full user guide to fwts-live is available at: https://wiki.ubuntu.com/HardwareEnablementTeam/Documentation/FirmwareTestSuiteLive

To help interpret any errors or warnings found by fwts we recommend visiting  fwts reference guide - this is has comprehensive description of each test and detailed explanations of warnings and error messages.

Below is a demo of fwts-live running inside QEMU:


Kudos to Chris Van Hoof for producing fwts-live

Tuesday, 27 July 2010

Multiple ISO Boot USB Key

Last week my colleague Ike Pan showed the Ubuntu Kernel Team how to create a bootable USB key with multiple ISO images on it. One simply copies ISO images to the USB key and these can be booted using grub's loopback support.

Thanks to Andy Whitcroft for helpfully writing up the step-by-step instructions.

Tuesday, 24 November 2009

Kernel Early Printk Messages

I've been messing around with the earlyprintk kernel options to allow me to get some form of debug out before the console drivers start later on in the kernel init phase. The earlyprintk kernel option supports debug output via the VGA, serial port and USB debug port.

The USB debug port is of interest - most modern systems seem to provide a debug port capability which allows one to send debug over USB to another machine. To check if your USB controller has this capability, use:

sudo lspci -vvv | grep "Debug port"

and look for a string such as "Capabilities: [58] Debug port: BAR=1 offset=00a0". You may have more than one of these on your system, so beware you use the correct one.

One selects this mode of earlyprintk debugging using:

earlyprintk=dbgp

for the default first port, or select the Nth debug enabled port using:

earlyprintk=dbgpN

One also needs to build a kernel with the following config option enabled:

CONFIG_EARLY_PRINTK_DBGP=y

On my debug set-up I used a NET20DC-USB Hi-Speed USB 2.0 Host-to-Host Debug Device connecting the target machine and a host with which I capture the USB debug using /dev/ttyUSB0 with minicom. So that I won't bore you with the details, this is all explained in the kernel documentation in Documentation/x86/earlyprintk.txt

As it was, I needed to tweak the earlyprintk driver to put in some delays in the EHCI probing and reset code to get it working on my fairly fast target laptop.
My experience with this approach wasn't great - I had to plug/unplug the debug device quite frequently for the earlyprintk EHCI reset and probe to work. Also, the EHCI USB driver initialisation later on in the kernel initialisation hung which wasn't useful.

Overall, I may have had problems with the host/target and/or the NET20DC-USB host-to-host device, but it did allow me to get some debug out, be it rather unreliably.

Probably an easier way to get debug out is just using the boot option:

earlyprintk=vga

however this has the problem that the messages are eventually overwritten by the real console.

Finally, for anyone with old legacy serial ports on their machine (which is quite unlikely nowadays with newer hardware), one can use:

earlyprintk=serial,ttySn,baudrate

where ttySn is the nth tty serial port.

One can also append the ",keep" option to not disable the earlyprintk once the real console is up and running.

So, with earlyprintk, there is some chance of being able to get some form of debug out to a device to allow one to debug kernel problems that occur early in the initialisation phase.

Sunday, 16 August 2009

Ubuntu on USB flash drives

Ubuntu provides the "USB Startup Disk Creator" tool to create a USB flash drive bootable image from the Ubuntu ISO images that can be downloaded from http://cdimage.ubuntu.com/releases/.

To use this tool, insert a FAT formatted USB stick, download a USB ISO image and then start the tool using: System->Administration->USB Startup Disk Creator and then enter you password.


You then select the ISO image you've just downloaded and make sure one has the correct USB flash drive selected. Then hit the "Make Startup Disk" button and after a few minutes you have a bootable USB flash drive equivalent to the ISO CD-ROM but with the extra bonus that it has persistent storage to save your documents and settings.

However, nowadays USB flash drives come in at 4GB to 16GB formats, so you have plenty of space to do a full Ubuntu installation and allow you to install extra packages - just like a conventional HDD. Also, the image will boot up much faster than the "USB Startup Disk" method. It's also worth noting that spending a little more on a fast USB flash drive is worth it. I've been using a 4GB Buffalo USB flash drive for a while and it's fast - don't be a cheapskate and go for price over speed.

A Ubuntu installation on a USB flash device can be achieved in various ways - one way is to initially install it using QEMU and then to dd the QEMU image onto the USB flash drive. This will then provide you with a system that can be run just like any conventional Ubuntu system on a HDD.

The instructions for this technique are written up here https://wiki.ubuntu.com/KernelTeam/InstallonUSBkey - prepare to take ~80 minutes or more to create the basic QEMU image.

The cool feature of using QEMU is that one can create a clean image which can then be copied onto multiple USB flash devices - which is ideal for rolling out test images for friends to try out or for creating test images with new features for testing at conferences or sprints.

Saturday, 15 August 2009

Debugging USB Problems

Recent Linux Kernels have the usbmon facility that allows one to gather traffic information (USB tracedata) on USB buses. It's a very helpful tool for allowing one to do low level USB debugging and my colleague Stefan Bader has written up a very useful guide here on the Ubuntu Kernel Team Knowledge Base. The guide describes how to debug USB Storage devices, and drills down to looking at the bulk transport layer. All in all it's a handy guide to show one how to dig in to examining USB traffic and sure to be help when one has troublesome USB devices that sometimes need quirking or workarounds.

Other usbmon guides can be found at:

http://groups.google.com/group/microdia/web/usbmon-user-guide
http://linuxinterviews.blogspot.com/2009/04/using-usbmon.html
http://www.linuxinsight.com/files/ols2005/zaitcev-reprint.pdf

Monday, 6 July 2009

Authorising USB devices for access

Normally when a USB device is connected to a Linux system it is automatically configured and then the device's interfaces become ready for users to access. While this is useful on most desktops use cases, there are situations where you may not want this, for example on Linux kiosks or servers where access must be limited.

Each USB device has an authorized file in the /sys interface, by writing "0" to this one disables authorization, and conversley writing a "1" to this authorizes a device to connect.

For example, to disable authorization:

echo 0 > /sys/devices/pci0000:00/0000:00:1a.7/usb1/authorized

Also, one can enable/disable authorisation on an entire USB hosts by writing to the authorized_default file:

echo 0 > devices/pci0000:00/0000:00:1d.0/usb5/authorized_default

By default, the authorized and authorized_default settings are set to 1, enabled.

Tuesday, 23 June 2009

USB persist, Webcams and Suspend/Resume

The other day I was looking at a problem with a laptop running Ubuntu Hardy that had an integrated USB webcam that failed to work over a suspend/resume cycle. A webcam viewer application such as Cheese or UCView was being run during the suspend/resume and had locked up after the resume. A workaround was to enable USB persist on this device as described in Documentation/usb/persist.txt in the kernel source.

From my understanding, if a USB host controller loses power (e.g. during a system syspend) then it is treated as if it has been unplugged. For devices like integrated webcams we know it cannot be unplugged, so we can enable USB persist.

USB host controllers can get reset after suspend to RAM on some systems, and you will see kernel messages such as "root hub lost power or was reset" (use dmesg to see this). In such cases, USB persist can save the day.

UBS persist keeps the USB device's core data structures persistent when power session disruption occurs. Essentially on resume the kernel checks if persist is set on the device, if so, it does a USB port reset, re-enumates and checks if the device is the same as the one before (e.g. checking descriptors and information such as produce and vendor IDs) it then re-uses the original device data structures.

USB persist for a device can be enables by echo'ing 1 to the devices persist file as root:

echo 1 >/sys/bus/usb/devices/.../power/persist

Below is a shell script to set USB persist for a device with a given IDVENDOR and IDPRODUCT USB ID.


#!/bin/sh
IDVENDOR=0123
IDPRODUCT=0afb
for I in /sys/bus/usb/devices/*/*
do
if [ -e $I/idVendor -a -e $I/idProduct ]; then
idvendor=`cat $I/idVendor`
idproduct=`cat $I/idProduct`
if [ x$idvendor = x$IDVENDOR -a x$idproduct = x$IDPRODUCT ]; then
if [ -e $I/../power/persist ]; then
echo 1 > $I/power/persist
fi
if [ -e $I/../power/persist ] ; then
echo 1 > $I/../power/persist
fi
fi
fi
done


Note that doing USB persist on pluggable USB devices is NOT recommended as it can cause kernel panics!