Every two weeks the Ubuntu Kernel Team have special Kernel Bug days where we focus our attention on specific kernel bug categories. The desire is to attack a bunch of bugs that need some more love and attention - there are an awful lot of bugs and they all take time and effort to resolve.
The good news is that we also like participation from community members to help triage and help fix bugs. Sometimes you may have the same hardware or know of a fix to a specific kernel, hardware or BIOS related bug and thus you may be able to help solve a few of those lingering kernel bugs!
For more information on about our Kernel Team Bug Days, please visit
https://wiki.ubuntu.com/KernelTeam/BugDay - feel free to join in and help solve some kernel bugs!
Showing posts with label ubuntu. Show all posts
Showing posts with label ubuntu. Show all posts
Tuesday, 18 August 2009
Sunday, 16 August 2009
Ubuntu on USB flash drives
Ubuntu provides the "USB Startup Disk Creator" tool to create a USB flash drive bootable image from the Ubuntu ISO images that can be downloaded from http://cdimage.ubuntu.com/releases/.
To use this tool, insert a FAT formatted USB stick, download a USB ISO image and then start the tool using: System->Administration->USB Startup Disk Creator and then enter you password.
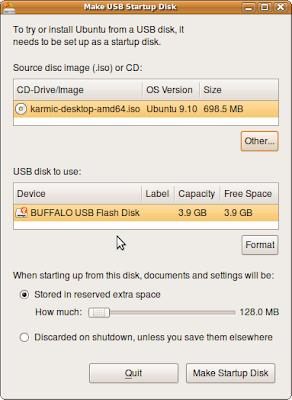
You then select the ISO image you've just downloaded and make sure one has the correct USB flash drive selected. Then hit the "Make Startup Disk" button and after a few minutes you have a bootable USB flash drive equivalent to the ISO CD-ROM but with the extra bonus that it has persistent storage to save your documents and settings.
However, nowadays USB flash drives come in at 4GB to 16GB formats, so you have plenty of space to do a full Ubuntu installation and allow you to install extra packages - just like a conventional HDD. Also, the image will boot up much faster than the "USB Startup Disk" method. It's also worth noting that spending a little more on a fast USB flash drive is worth it. I've been using a 4GB Buffalo USB flash drive for a while and it's fast - don't be a cheapskate and go for price over speed.
A Ubuntu installation on a USB flash device can be achieved in various ways - one way is to initially install it using QEMU and then to dd the QEMU image onto the USB flash drive. This will then provide you with a system that can be run just like any conventional Ubuntu system on a HDD.
The instructions for this technique are written up here https://wiki.ubuntu.com/KernelTeam/InstallonUSBkey - prepare to take ~80 minutes or more to create the basic QEMU image.
The cool feature of using QEMU is that one can create a clean image which can then be copied onto multiple USB flash devices - which is ideal for rolling out test images for friends to try out or for creating test images with new features for testing at conferences or sprints.
Friday, 14 August 2009
Cloning my installed packages
This week was a bit of a nightmare because I suffered a HDD crash on my laptop. Installing Ubuntu from new isn't a big deal and restoring my /home data is slow but straight forward. However, installing all my favourite previously installed packages from memory is just a pain and nearly impossible to get right. The solution is to keep a record of what's installed so that one can pull in these packages on a clean fresh install.
To dump out the installed packages on a system, use:
dpkg --get-selections > installed.log
To re-install these packages on a clean fresh install use:
sudo dpkg --set-selections < installed.log
and then run:
sudo apt-get -u dselect-upgrade
It's also helpful to keep a backup of any configuration settings, e.g. files in /etc. I hope this saves you some pain next time you hit this kind of problem!
Ubuntu 9.10 Karmic Alpha 4 - Ready to Test!
Ubuntu 9.10 Karmic Alpha 4 is now ready to download and test. This is a great opportunity to boot your machine with a LiveCD (or USB image) and check out to see if there any regressions - and if so, please file a bug so it can be fixed before the final version is rolled out.
I'm currently running Karmic on my laptop and servers. I'm really impressed with the improved boot speed and the Kernel Mode Setting (KMS). KMS is especially effective with suspend/resume and also reduces the screen mode transitions during boot.
So download a suitable Alpha 4 image give it a try!
I'm currently running Karmic on my laptop and servers. I'm really impressed with the improved boot speed and the Kernel Mode Setting (KMS). KMS is especially effective with suspend/resume and also reduces the screen mode transitions during boot.
So download a suitable Alpha 4 image give it a try!
Friday, 24 July 2009
Ubuntu Karmic Alpha 3 ready for testing!
Ubuntu Karmic Koala Alpha 3 is ready for downloading and testing.
This is an Alpha release. Do not install it in production machines. The final version will be released on October 29th 2009.
Features include:
GNOME 2.27.4 development version
Empathy as the default messaging client
gdm 2.27.4 login manager
Ubuntu One file sharing service
Linux 2.6.31 kernel
New UXA Intel Video Driver acceleration method
Kernel Mode Setting (KMS)
gcc 4.4
ext4 filesystem by default
GRUB2 by default
ISOs and torrents available at:
http://cdimage.ubuntu.com/releases/karmic/alpha-3/ Ubuntu Desktop, Server, Netbook Remix
http://cdimage.ubuntu.com/kubuntu/releases/karmic/alpha-3/ Kubuntu Desktop and Netbook
http://cdimage.ubuntu.com/xubuntu/releases/karmic/alpha-3/ Xubuntu
http://cdimage.ubuntu.com/ubuntustudio/releases/karmic/alpha-3/ Ubuntu Studio
Check out the Karmic Alpha 3 webpage for the full details.
Friday, 17 July 2009
More Ubuntu Wubi Notes..
1. Wubi is a way to allow Windows users to install (and uninstall) Ubuntu as if it's a Windows application in a simple straight forward way that does not modify the Windows partitioning.
2. The official Wubi Wiki page contains all you need to know to get started on Wubi.
3. Bugs can be reported and tracked on the Wubi LaunchPad project page.
4. The Wubi project page can be found here.
5. The Wubi Blogosphere may have some useful tips and hints about Wubi.
6. Some extra historical context to this project can be found at Wikipedia.
7. A video of Agostino Russo's Wubi talk at UDS Prague (Intrepid Ibex) is worth watching; the talk also contains a demo of the Wubi installer.
Hope that's a helpful start.
Thursday, 16 July 2009
The Ubuntu Museum

Ubuntu has evolved over the past few years and so that we don't lose and forget some of the unsupported versions Dustin Kirkland has created the Ubuntu Museum.
The Museum has screenshots, screencasts, and usable virtual appliance images of each of the retired Ubuntu releases for you to watch, download and re-experience. The virtual images are QEMU qcow2 disk images of the i386 Desktop edition of each version of Ubuntu.
So, got back down memory land and visit the Ubuntu Museum... enjoy!
Tuesday, 14 July 2009
Ubuntu 9.10 Karmic Koala Alpha Testing
Ubuntu 9.10 Karmic Koala is still in its early Alpha stage, but I bit the bullet over the weekend and did a clean install on my Lenovo 3000 N200 laptop. Although I've been running with a Karmic kernel on my laptop for several weeks and also upgraded my servers to Karmic very early on, it's only now that I decided it was time to go the whole hog and upgrade my laptop.
Rather than just do a rolling upgrade from Jaunty to Karmic, I backed up my home directories and some configs in /etc and then did a clean install from Alpha 2 and pulled in all the updates. Then I restored /home and did some minor tweaks to my configs.
Starting afresh is quite cathartic; I got rid of a load of old applications that I'd installed a while ago and don't use any more, and I also started afresh with ext4. Ext4 brings some more speed, especially when fsck'ing the drive on boot. Ext4 is noticeably faster when removing hundreds of files, for example rm -rf on kernel source trees.
Karmic also now uses the Grub2 boot loader; this is working well across a wide variety of machines, as can be seen from the Grub2 testing page.
With Karmic we also get Kernel Mode Setting (KMS) too. So far, this is working fine - you soon notice that there are less screen mode setting flickers on boot and suspend/resume is slicker. Audio works OK with the default audio player Rhythmbox and with proprietary software such as Skype - I've not yet noticed any audio dropping, so this is a good sign so far.
There's going to be a lot more changes made over the next months, hopefully we won't see many regressions on the kernel, but with all the change, stuff does occasionally get broken. So I encourage you to help us by testing the Alpha and Beta releases of Karmic so we can squish those bugs and get changes upstream good and early!
Thursday, 9 July 2009
Ubuntu Mainline Kernel Builds
Ubuntu systems generally run with Ubuntu kernels which are based on mainline kernels and also have numerous patches for bug fixes, security fixes and some extra hardware support. Sometimes it can be useful to run your system with an unmodified mailine kernel, for example, when one needs to check if problems have been fixed with an upstream kernel or if a Ubuntu patch causes a regression.
My colleague Andy Whitcroft (~apw) has worked hard to provide us now with mainline kernel builds. These kernels are unmodified kernel source, built against the Ubuntu kernel configuration files and packaged as .deb files for allow simple installation and testing.
The mainline kernels archive is located at: http://kernel.ubuntu.com/~kernel-ppa/mainline/
and there are a full set of instructions available on the MainlineBuilds wiki page.
Buyer beware. These kernels do not include any of the Ubuntu specific drivers and there are no restricted modules either, so your mileage may vary. Also note that the further the kernel version is from the base kernel the more likely one is to get incompatabilites with user space. Also, the kernel team does not support these kernels, so use them at your own risk.
Wednesday, 24 June 2009
Installing Jaunty UNR in VirtualBox
Sometimes it's useful to be able to run Ubuntu as a virtual machine inside VirtualBox for testing and debugging purposes. The problem with the basic version of VirtualBox is that it does not support installing from USB, which is a problem when faced with installing from USB images, such as Ubuntu Netbook Remix (UNR). To get around this, install UNR as follows:
If you've not already installed VirtualBox, you can install it using:
sudo apt-get install virtualbox-ose
Convert the USB bootable image into a bootable VirtualBox VDI image:
Create an 8GB empty disc image to install this into:
VBoxManage createhd -filename ubuntu-9.04-netbook-remix-i386.vdi -size 8192 -register
Create a new VM using the
After the installation is complete remove the ubuntu-9.04-netbook-remix-bootable-i386.vdi
primary drive from your virtual machine and set ubuntu-9.04-netbook-remix-i386.vdi to be the primary IDE drive.
OK, so it's a little bit of messing around, but it does the trick.

Jaunty UNR installed in VirtualBox
Wednesday, 17 June 2009
Wubi
Wubi is an installer that allows Windows users to install and un-install Ubuntu just like a Windows application. Wubi does require Ubuntu partitions to be added and does not install a new boot loader. However, it does allow Ubuntu to be dual-booted on the Windows PC and run just like a conventionally installed Ubuntu system.
There is a little magic going on. Wubi creates a large file on the Windows NTFS partition which contains Ubuntu in the form of ext3 filesystem. When Ubuntu boots up, it mounts the NTFS partition using NTFS-3G (via fuse, "file system in user space") and then loop mounts the file on the NTFS drive that contains the ext3 Ubuntu file system.
To make sure dirty pages are written back to disk for file system consistency Wubi does some vm tweaks. This is required just because Wubi uses stacked file systems (NTFS-3G+fuse, loop) and dirty pages sometimes hang around a while in memory.
The Wubi installer is on the Ubuntu ISO image, so a Windows user can load a Ubuntu Live CD and Windows will auto-run the Wubi installer. This allows Windows users to install Ubuntu and give it a try!
Postscript: I've added more Wubi notes in this newer blog article.
Subscribe to:
Posts (Atom)